There are three steps to installing abapGit on SAP. They are as follows.
- Installing the current abapGit repository on your SAP system, which involves setting up a link between your SAP system and GitHub to enable the download.
- Keeping your abapGit version up to date automatically, which involves setting up a batch job to make sure your version is always up to date.
- Watching the abapGit repository to stay informed of improvements and fixes to the abapGit product.
We’ll walk through these steps one by one in this blog post.
Installing the abapGit Repository in Your SAP System
The first step is to go to the repository on GitHub where the abapGit project lives. The URL is https://github.com/abapGit/abapGit. You’ll land at the page shown below.
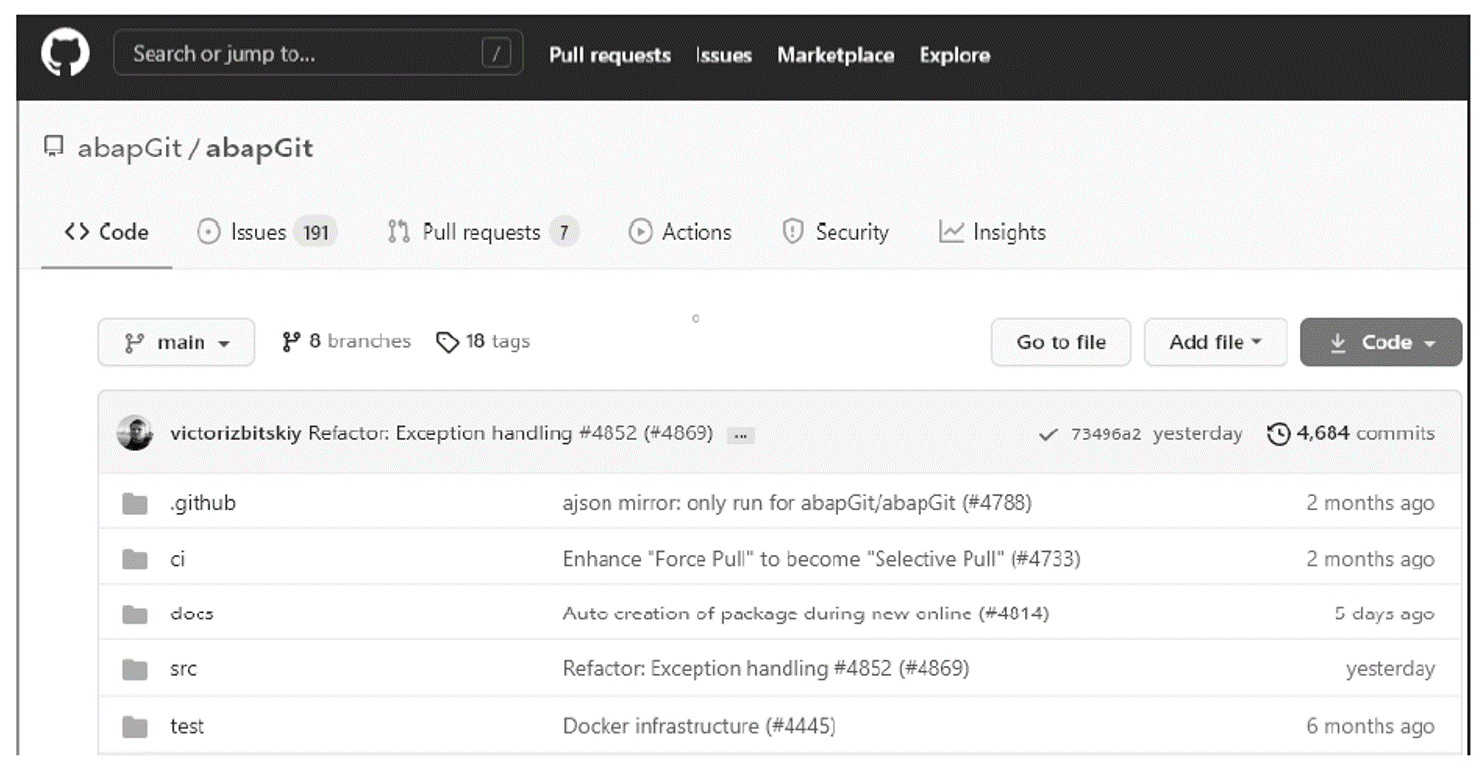
Instantly, you’ll be prompted to register for a GitHub account if you don’t already have one. If you don’t, there’s no reason not to sign up straight away: it’s free, and this is only going to get more and more important in the crazy world of SAP as time goes by.
Then you need to scroll down until you reach the part of the page that points you to the documentation. The URL for this is http://docs.abapgit.org/. This will take you to the web page shown here.
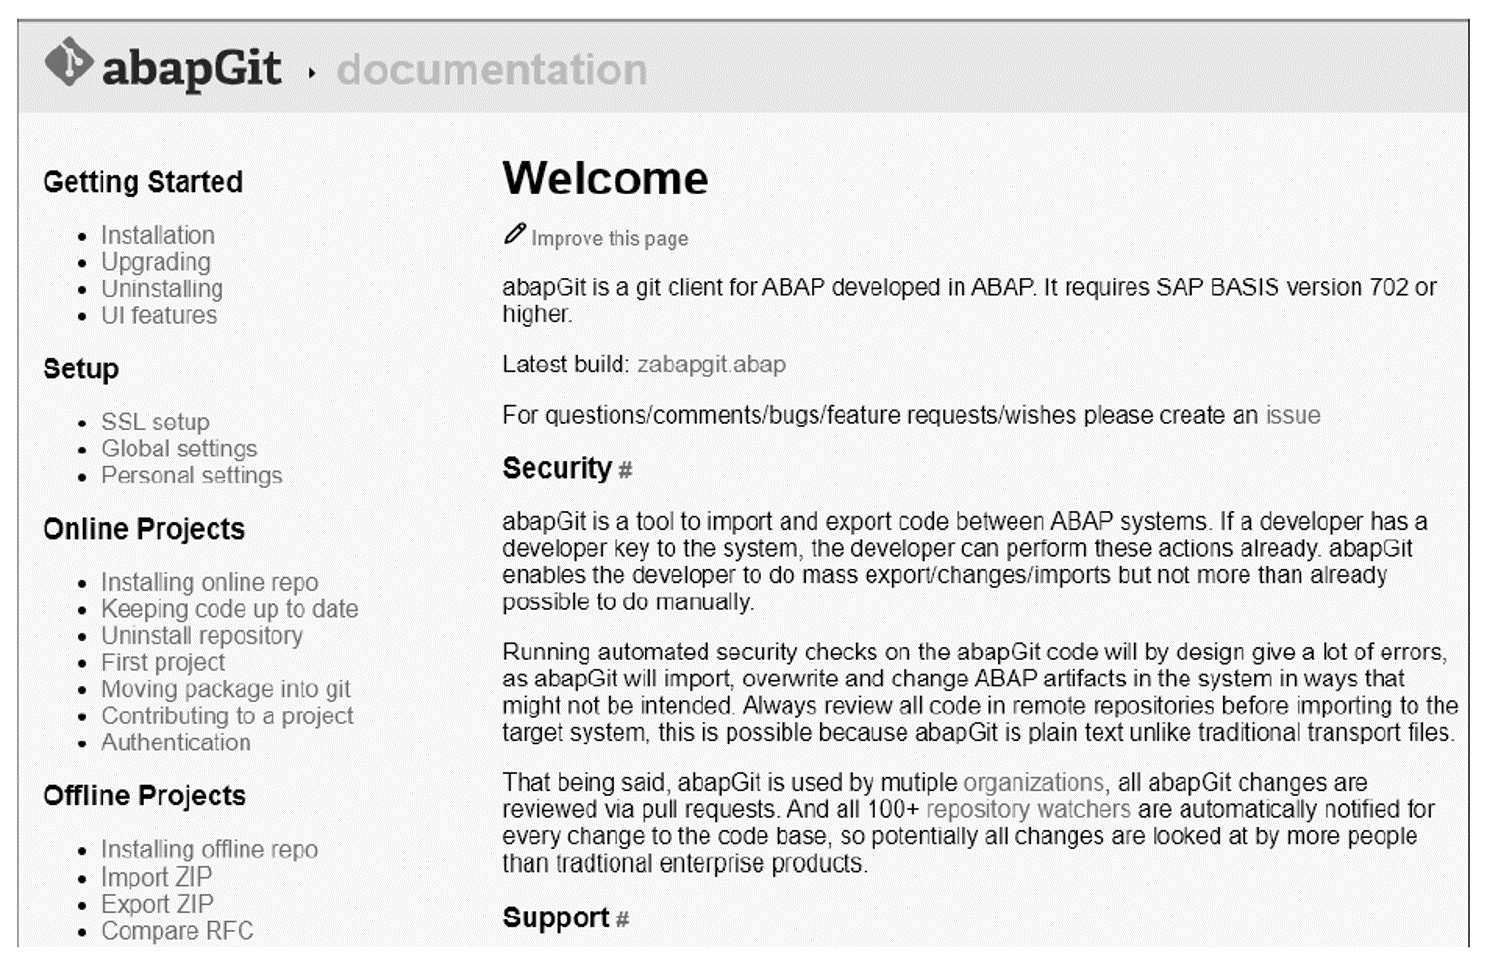
There’s nothing magically exciting about the next step. You click the zabapgit.abap link to access the text of a massive program called ZABAPGIT_STANDALONE, which you cut and paste into your system using SE38—or, indeed, Eclipse.
abapGit should work on any SAP system from 7.02 and up; syntax elements that don’t compile in 7.02 (like inline declarations) aren’t supposed to be used in abapGit classes. If you’re on a 7.02 system and get syntax errors, raise an issue on the GitHub page where the abapGit project lives, and those issues will most likely get solved very quickly.
Your next step will be to create a transaction to call the program you just copied— let’s be wonderfully imaginative and call the transaction ZABAPGIT—and you’re good to go. When you call that transaction, the screen shown in the following figure appears inside SAP GUI. When you try this, it will be a lot emptier than the screenshot because you haven’t selected any repositories yet. All you will see is the menu and an empty main screen.
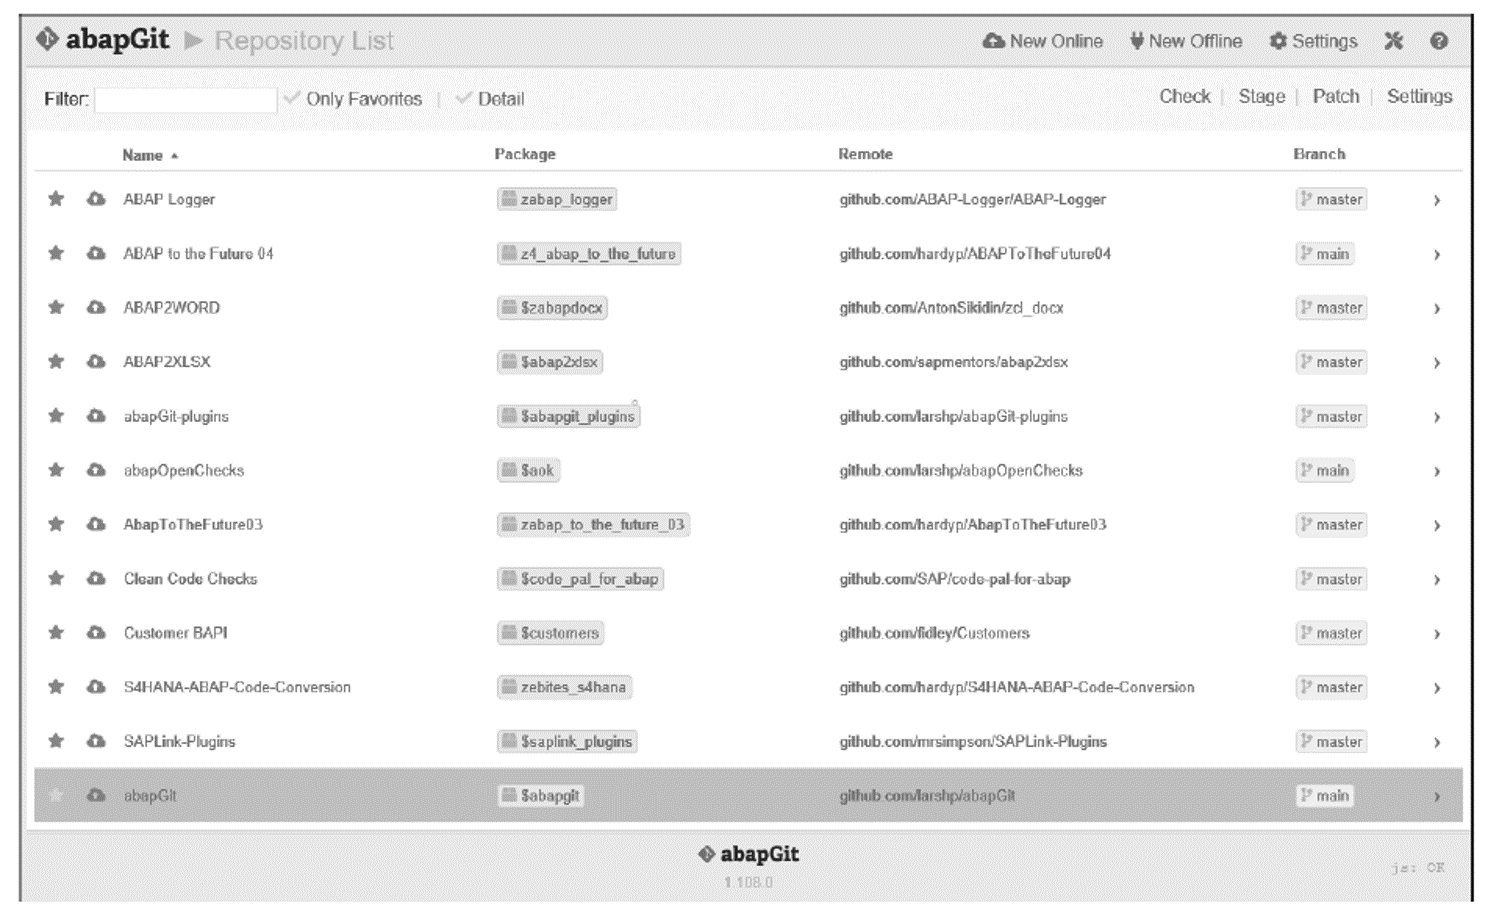
You’ll notice that the screen doesn’t look much like the standard SAP GUI. In this case, you have an HTML page sitting inside the SAP GUI. So far, so good: the next step is to enable your SAP system to talk to GitHub.
In the documentation on the abapGit site, it says you need to set up SSL to connect to GitHub, and you get a link with some instructions that start with the following:
- On Chrome, go to https://github.com.
- Click the locker near the address bar, then click Certificate.
The first bit was easy. I then spent half an hour trying to work out what a “locker” was. Eventually the light bulb went on: here, it seems, a locker is a padlock, and you can see that at the top left of the screen just before “github.com”. Once I worked that out, it was easy to follow the rest of the instructions, which revolve around downloading the certificate from the web and uploading it to SAP via Transaction STRUST. As this is perhaps one of the least intuitive transactions ever created in the universe, making it easy to get into trouble with it, let’s walk through it. The next instructions are as follows:
- The developer tools will open at the Certificate tab.
- Go to the Details tab and click Copy to File… to export to a .CER file.
- Open the Certification Path tab and navigate to the parent node at the tree; do this “until the root.”
The instructions for how to export the certificate are clear enough; the line that ends with “until the root” is the confusing one. What it means is that you have to export more than one certificate. You’ll see a tree of certificates as shown below when you open the Certification Path tab.
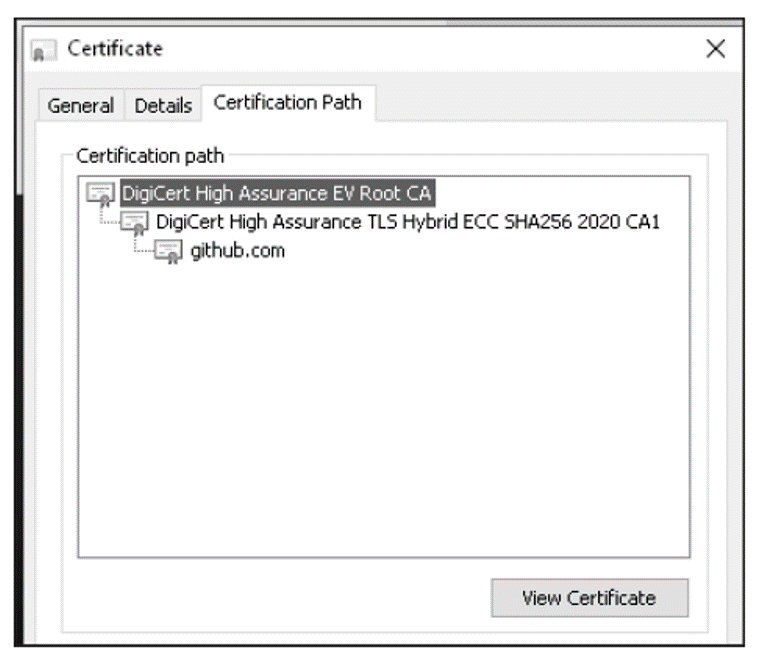
What you have to do is click every level of the tree and download the certificate. Then in STRUST you choose the SSL Client SSL Client (Anonymous) option (I wonder about the burning need to say the same words twice at the start), pick your SAP system, and then upload the certificates one by one. However, it’s not as easy as you might think. Take a look at the STRUST menu below. What you need to do first is select the leftmost icon and upload a certificate. Then you need to click the Add to Certificate List button. Finally, you need to go to the top and click the Save button.

Once you’ve completed these steps, you’ll need to repeat the process for the http://api.github.com website.
Next you need to be sure that what you’ve done actually worked. This involves going to http://docs.abapgit.org/other-test-ssl.html and cutting and pasting a connection test program into your SAP system.
Sorting Out Errors: Let’s say you run that program and get error messages. To quote Keanu Reeves, “What do you do?” Bursting into tears is one option. Another possibility is to get in touch with your friendly SAP Basis department. (That’s what I did.) It transpires that Transaction STRUST isn’t enabled by default. Happily, there’s an SAP Note that tells you what to do—namely, SAP Note 510007—which the abapGit help points you to. Your SAP Basis person has to set two parameters in the default profile and possibly restart the system. Those parameters are as follows:
- ssl/client_ciphersuites = 150:PFS:HIGH::EC_P256:EC_HIGH
- ssl/ciphersuites = 135:PFS:HIGH::EC_P256:EC_HIGH
Not very meaningful for your average bear, but once these parameters are set up, your system should connect to GitHub like a dream.
You’ve set up the connection to GitHub, so now you need to link to the specific abapGit repository.
You do this by running your ZABAPGIT transaction and then clicking the New Online button. You’ll see a screen that looks like the one below. You have to enter “https://github.com/abapGit/abapGit/” as the URL and “$ABAPGIT” as the package.
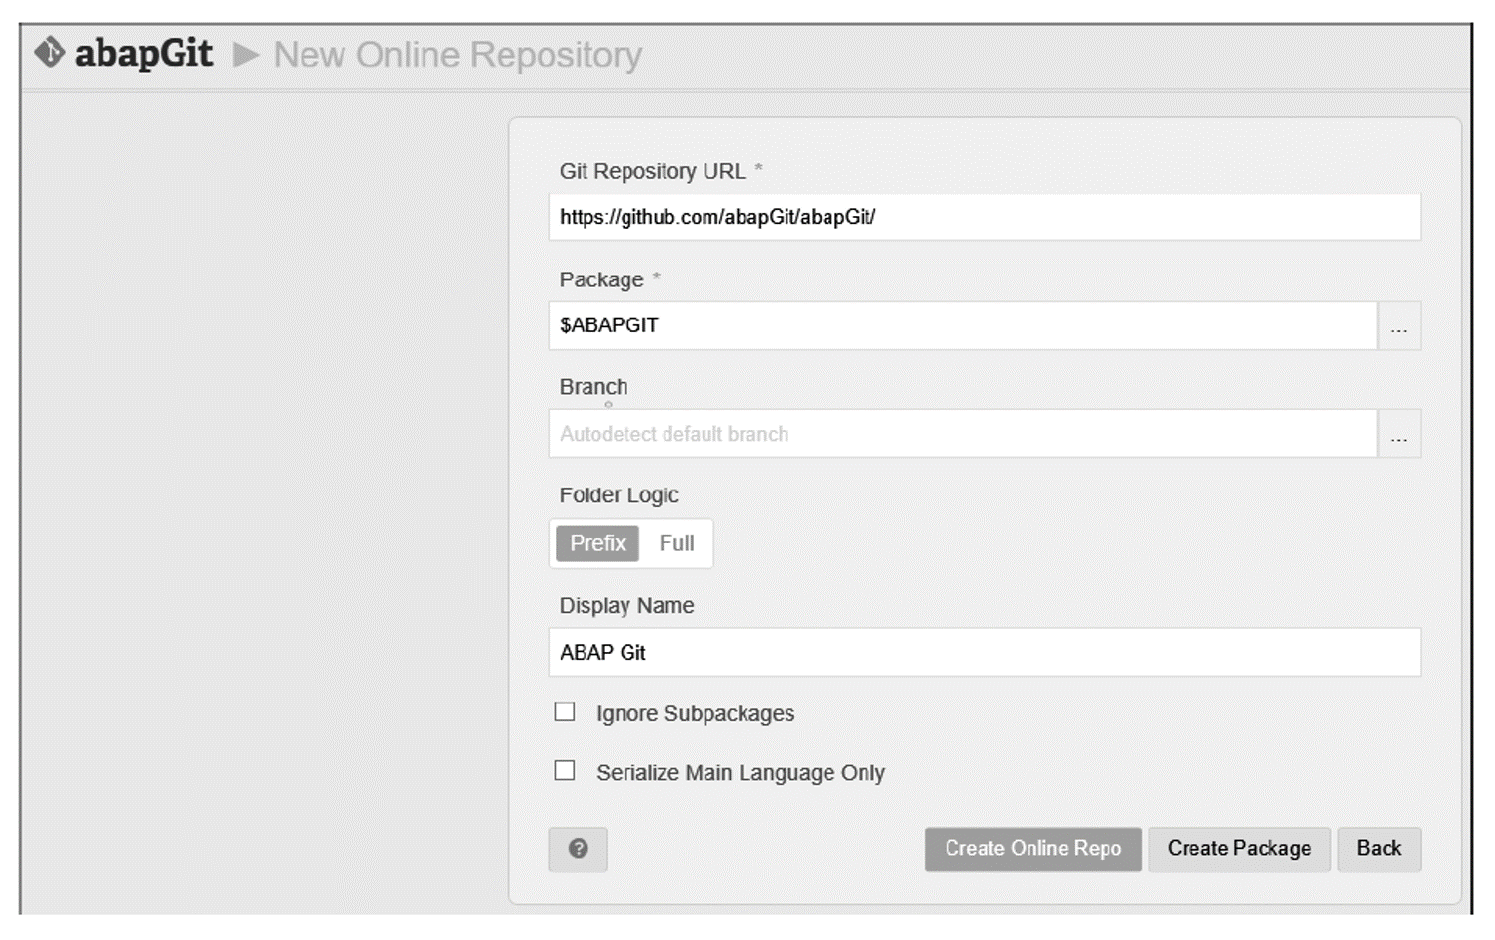
Then select the options Create Online Repo and then Pull.
You now have a connection to the GitHub site, so the latest version will be retrieved. You’ll then be told that the ZABAPGIT program already exists in your system. Well, of course it does; otherwise you wouldn’t be seeing this question in the first place. So just check the Overwrite box and click the green checkmark, as shown here.
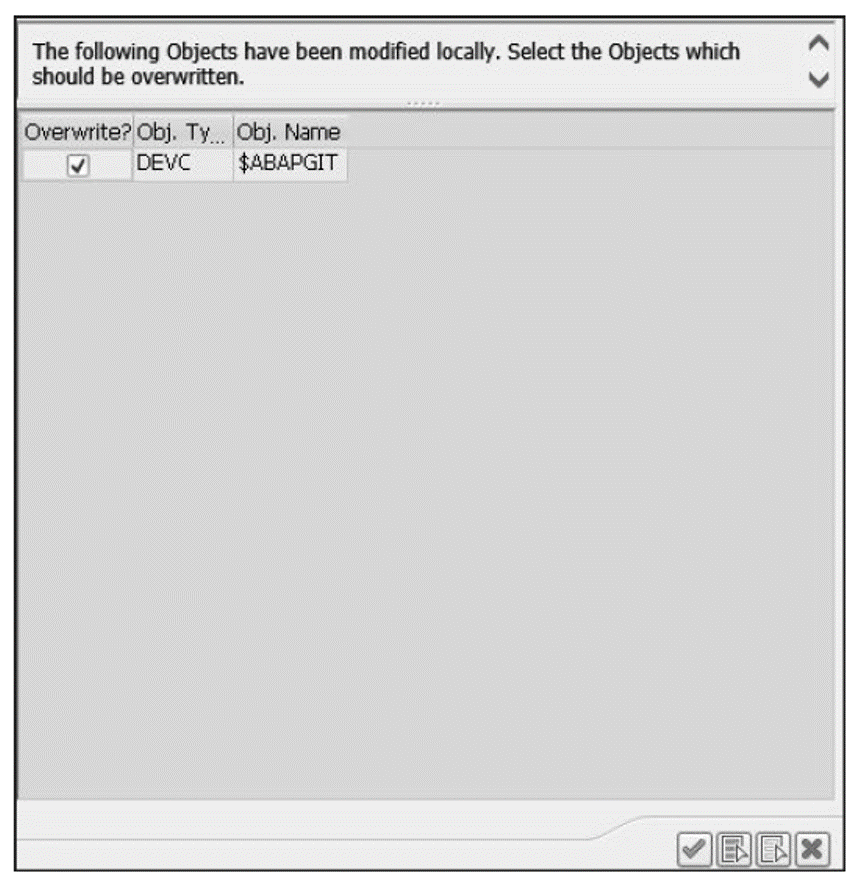
This may take a while because there are quite a lot of objects to download. While the repository is being downloaded, at the bottom of the screen you’ll see status messages like Deserialize Object XYZ, indicating that an XML representation is being changed into an actual ABAP repository object.
When the download finishes, you’ll be asked to activate everything, which just involves clicking the green checkmark again. You can now use Transaction SE80 (or Eclipse) to look at local package $ABAPGIT, and you’ll see a whole bunch of objects, like the ones below.
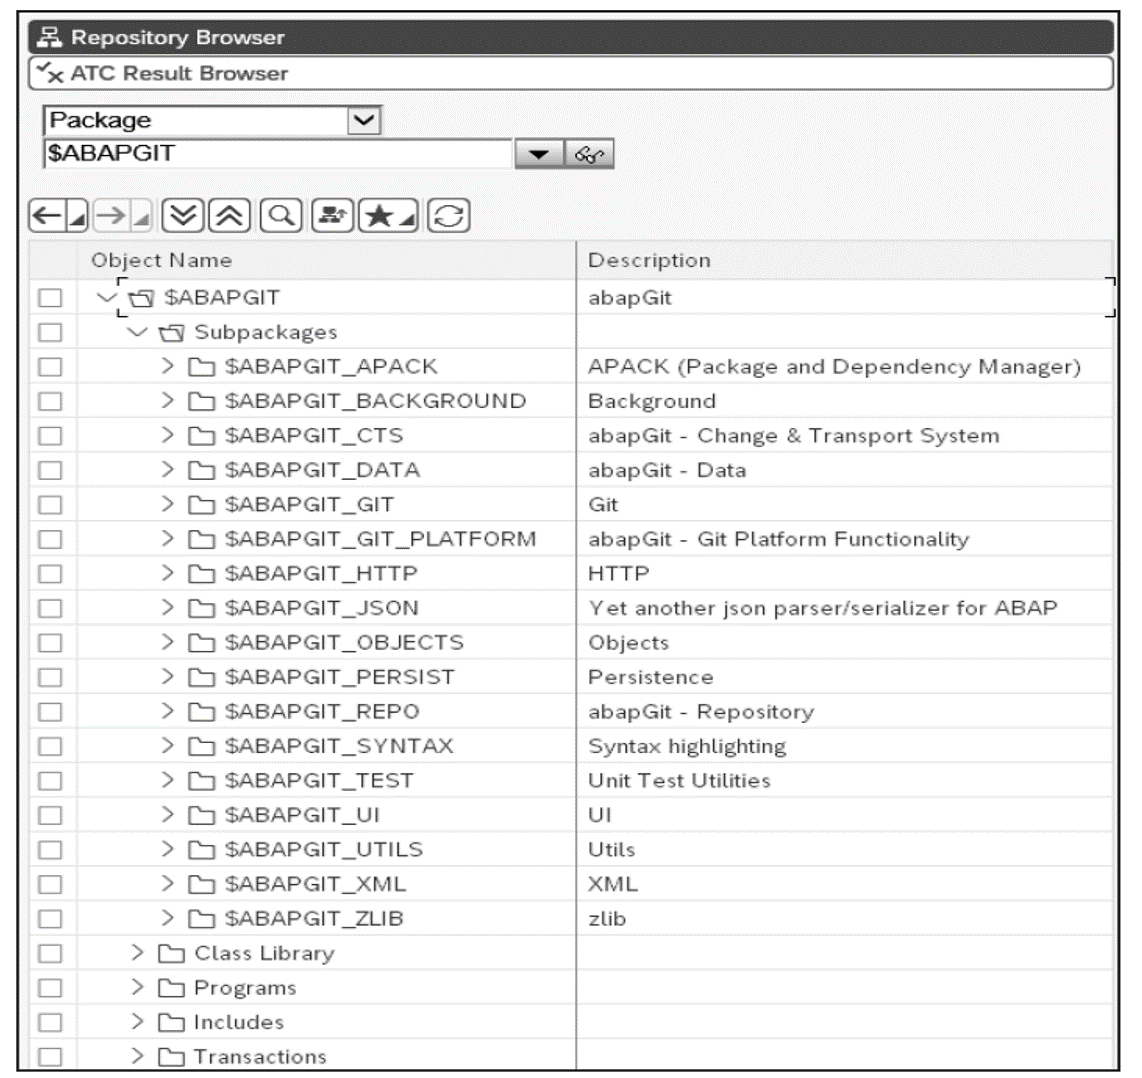
Coming Attractions: abapGit is written with unit tests in mind, which is why you’ll find lots of classes with suffixes like factory and injector.
There is a very large number of objects, as you can see. In the $ABAPGIT_OBJECT subpackage, you can see subclasses that deal with each R3TR object type. This is just like the SAPlink plug-ins, right down to the extent that if a class doesn’t exist to handle an R3TR type you want moved, then you’re strongly encouraged to create it yourself and then donate it to the project as a whole.
There seem to be a lot more object types supported than there were with SAPlink. Moreover, you even have support for Customizing using Business Configuration Sets, which are sets of Customizing settings that can be transported using the standard SAP object type SCP1.
Keeping Your abapGit Version Up to Date
The next step is to connect your development system to GitHub so that every time a new-and-improved version of abapGit comes out (which is very often), you get the new version without having to do anything after you’ve made the settings described in this section. That’s quite a radical idea in the SAP world: cloud products like SAP Ariba and SAP SuccessFactors get automatic updates at regular intervals, so you’re always on the latest version, but applying the same idea in an on-premise ABAP system is so revolutionary that it makes Che Guevara look like a boring square.
Just to give you an idea of why this is important, the third figure in this post had a version number of 1.108.0. By the time you install it, that number will be far higher. As with many open-source projects, there’s a new version out almost every day; the ABAP in Eclipse tools are updated almost as frequently.
In most software products (Eclipse springs to mind, but virtually every single one I can think of), you can set an option to update automatically—and it’s no different here, apart from the fact that this is a new concept for ABAP programs.
This all hinges on the fact that the abapGit code is local; otherwise, loading a new version would prompt a transport request. If you think about it, code that’s solely to do with development (especially code that imports other code) has no place being outside the development system, so being local is appropriate here.
First you have to navigate to the abapGit repository from the main screen. Once you’re there, you need to click the icon at the very far right of the screen shown below— the icon to the right of the word Refresh that looks like a cog and says Repository Settings when you hover over it.

Once you click that cog button, you’re taken to a new screen where the body is full of assorted settings, which we’ll ignore for now. The important thing is to spot and click the Background button at the top, as shown here.

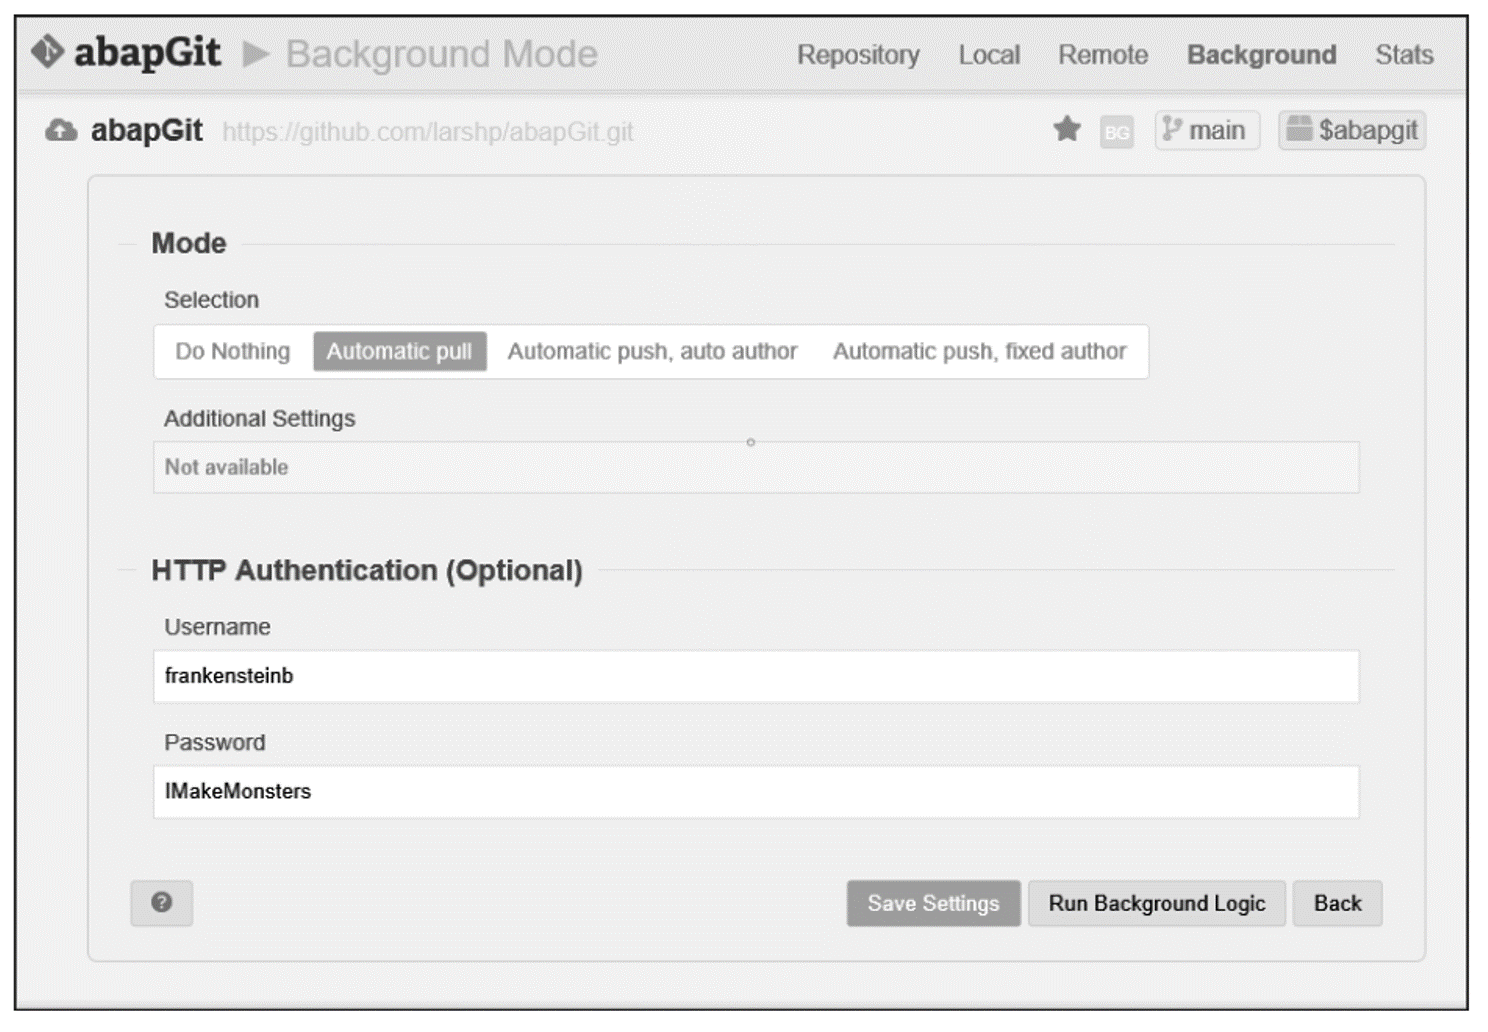
On the next screen that appears (see the next figure), you need to set the mode to Automatic Pull because you want to pull the latest version from the internet to your SAP system. The HTTP authentication details store your Git username and password.
You make your changes and then click Save Settings, which leaves you on the same screen. All well and good: the program now knows it has to retrieve the latest version whenever it’s run. You don’t want to be bothered with doing that manually every day, however, so you want to set up a batch job to do this task for you automatically.
Use Transaction SM36 to schedule program ZABAPGIT_STANDALONE to run at, say, 11:55:55 each night or some such. If you’re reading this post in the first place, it’s probably safe to say that you know how to schedule a background job!
At this point, everything is set up. Each morning when you log into the SAP development environment, you’ll automatically have the latest version of abapGit.
Watching the abapGit Repository
It’s possible to subscribe to a repository on GitHub to be notified automatically when something interesting happens—for example, a new issue is raised or someone says she’s working on fixing that issue by “pulling” the code to her local environment so she can fix/enhance it. This is just like Google news feeds that you can subscribe to for daily updates on any topic you wish. You wouldn’t believe how many such news articles there are, and it’s the same with abapGit. It’s a very active project.
In this case, you just need to go to the following URL: https://github.com/abapGit/abapGit. At the top right on the screen shown below, you’ll see options for what notifications you want to get. You can choose the Watching option and then see everything that’s happening.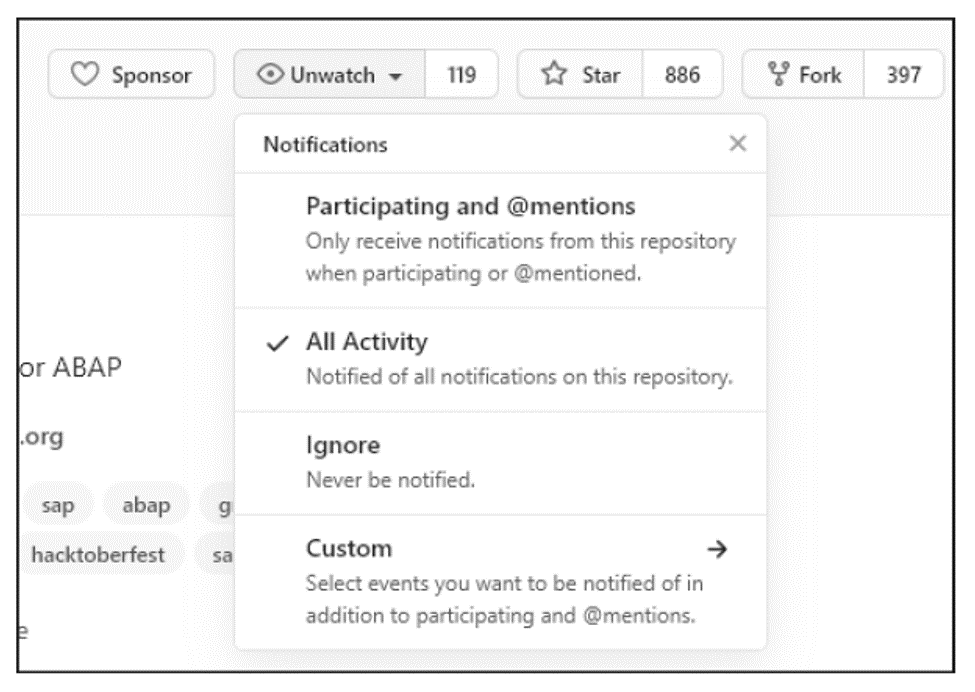
Once you’re watching the repository, you get emails any time someone reports an issue or people say they’re working on fixing it or indeed have fixed it. It’s good to watch this space, as it were, for a week at least, just to get an idea of what a vibrant open-source project with loads of people contributing to it looks like. When you start to feel bombarded (which you will), you can switch the “watching” setting off again.
By that point, though, hopefully you’ll have been inspired to get yourself involved in this or a similar open-source project.
This content was originally posted on the SAP PRESS Blog and has been adapted from a section of the book ABAP to the Future by Paul Hardy. Used with permission of SAP PRESS. All rights reserved.
